¶ Enable Motioncompensation for SteamVR HMD's
The RacingCUBE is a powerful machine and without motion compensation it can be hard to use VR as it's not built into the software. Depending on the settings on the motion platform you might encounter in-game camera “hopping” and the headset becomes uncalibrated. The issues are mostly visible if the simulator moves a lot and therefore motion canceling software is a necessity. This guide explains how to use the software OpenVR-InputEmulator with the RacingCUBE.
¶ You Will Need
Only a few things are needed for this, you can see what below.
• HTC Vive/Pro or Valve Index or possibly other HMD's that runs off of SteamVR.
• 1 Base Station (Preferably 2 to make sure it won't loose tracking).
• 1 Vive Tracker (2018 or later) - You can also use a hand controller if you prefer.
• The latest OpenVR-InputEmulator release.
• The latest patch for OpenVR-InputEmulator.
• SteamVR installed and configured.
Before continuing with the guide make sure SteamVR is installed and configured. If you don’t do that you will not be able to install OpenVR or open the menu.
¶ Downloads
- OpenVR-InputEmulator Download the motion compensation software.
- OpenVR-InputEmulator Patch Download the motion compensation software patch.
¶ Setting up the hardware
Tracker: To be able to use the motion cancelling software you will need to have a Vive Tracker or a hand controller. fasten the Tracker (Or controller) securely to the TOP of the seat. Make sure it is tight and cannot move at all, as it is used to cancel out the unwanted motions.
![]()
Base Stations: You can use one or two Base Stations but the recommended is two to support each other. the stations should be placed in the ceiling with one pointing directly down at the simulator and the second you can place else where. Just make sure both stations can see the Tracker and the HMD at all time.
After placing the Base Stations, calibrate them as you would normally do after setting them up.
¶ Installing the software
Once the hardware and SteamVR is ready you are ready to install the OpenVR Emulator software.
• Close Steam completely down (Important!)
• Install the OpenVR-InputEmulator software by running the .exe and follow the on-screen instructions.
• install the patch by copying the downloaded .DLL and pasting it in the SteamVR folder here: C:\Steam\steamapps\common\SteamVR\drivers\00vrinputemulator\bin\win64
(Your Steam folder might be placed at another location)
• Open Steam and you are done.
¶ Opening OpenVR
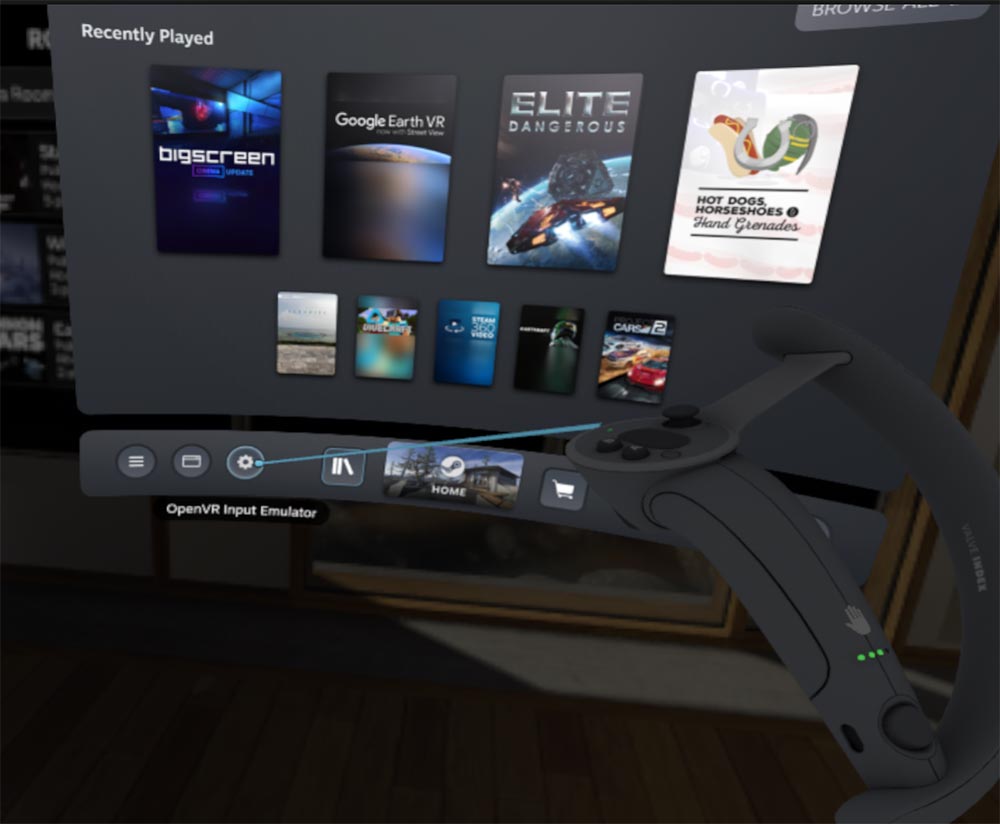
Put on your HMD and look for the gear icon showed in the below picture, this is the main menu of the OpenVR Input Emulator software and it's where all the magic happens.
¶ Configuring OpenVR
The software can be configured in many way and you can play with the settings if you feel something is not quite to your liking. The below settings are the ones we find the best.

- Choose the Tracker or Controller, the units that's mounted to the chair (NOT HMD showed on the picture).
- Choose Motion Compensation as showed, click Apply.
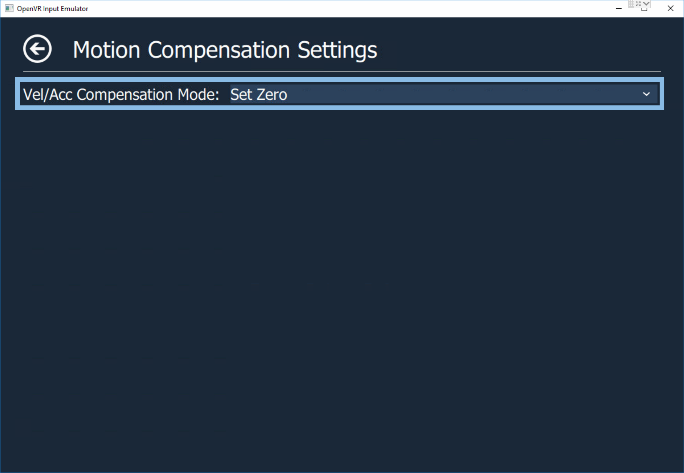
- Click on the Motion Compensation Settings button.
- In the menu (Right picture) choose Disabled OR Set Zero, depends on your preferences. Usually Disabled is the best.
- Click Apply.
You now have motion compensation enabled for all games. Before starting the game, make sure Camera, HMD and controller is on and active. Start the game and enjoy motion compensation. If you turn off SteamVR you need to do step 1 - 2 again.
The motion compensation also works on games not running through SteamVR, the only requirements is that the game have to support the SteamVR platform.
¶ Troubleshooting
¶ I cannon install the software
If you get the message one the picture, it means you have not installed SteamVR.

¶ The startdesktopmode.bat will not open
(Only used if VR mode does not work)
You also have gotten the above message than, and you need to install SteamVR
¶ Set Zero crashed the program
You have not set up SteamVR, please follow the SteamVR setup guide OR you have not installed the OpenVR Patch as described above.